
Demo Content
Demo Content
RokCandy Component

For example, [example title={title}]{text}[/example] can be set to output the following:-
<div class="example">
	<h3>Title</h3>
	<p>Some content</p>
</div>
How do I configure RokCandy, the Syntax?
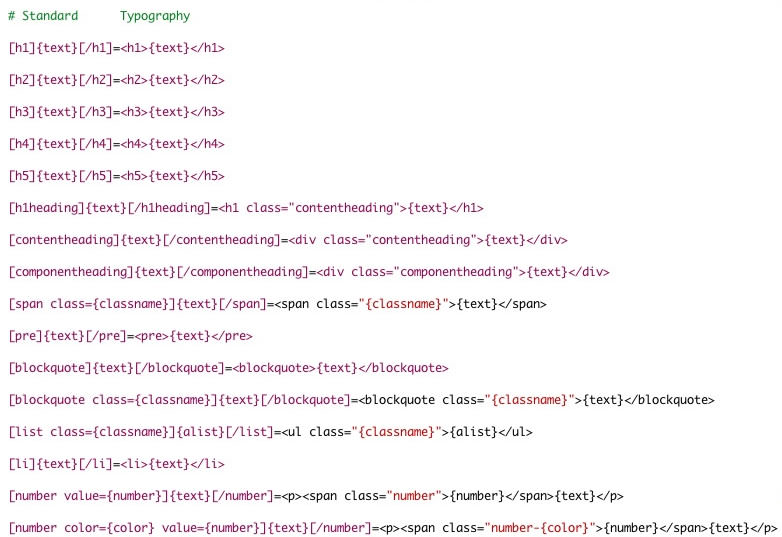
RokCandy is outfitted with prebuilt statements, however, with the overriding ability of Joomla 1.5, you can create new ones and override them in the template files, and not have to concern yourself with editing core files. The file is called default.ini and is located in the /templates/rt_solarsentinel/html/com_rokcandy directory. Similarly, you can also add and control your own in the Administrator (Admin > Components > RokCandy). They will appear in the following format:-
[tag]{text}[/tag]=<tag>{text}</tag>
Such as
[alert]{text}[/alert]=<span class="alert">{text}</span>
As is apparent, each line is separated into distinctive sections. There are two parts, the RokCandy syntax (left of =) and the outputted HTML (right of =). You would create your own tag name and insert them between square brackets, [], followed by {text} and the closing tag with [] brackets again. This segment is followed by the = symbol and following on from that is the HTML output. Note, the {text} is required in both parts to denote what element is to be carried forward. You can use any value between the {} brackets, such as {title} or {link} as long as they are cross referenced in the HTML output as shown in the example below:-
[box title={title} link={link}]{text}[/box]=<div class="box"><h3><a href="/sitesweb/2-v3/{link}">{title}</a></h3><p>{text}</p></div>
Note, the best way to understand the syntax rules is to look at the default.ini file and see what syntax we use.
RokCandy Examples
Module Variations
SolarSentinel is accompanied by 9 module class suffixes / variations / hilites. These are:-
- blue
- orange
- black
- green
- grey
- darkgrey
- darkbeige
- red
- advertisement
If you were to add and/or use a suffix, follow these instructions. To apply a suffix, login into the administrator and navigate to Extensions > Module Manager. There, select your module and locate the Module Class Suffix input field. Insert your module class suffix in this box and save.
Preset Styles


Module Positions
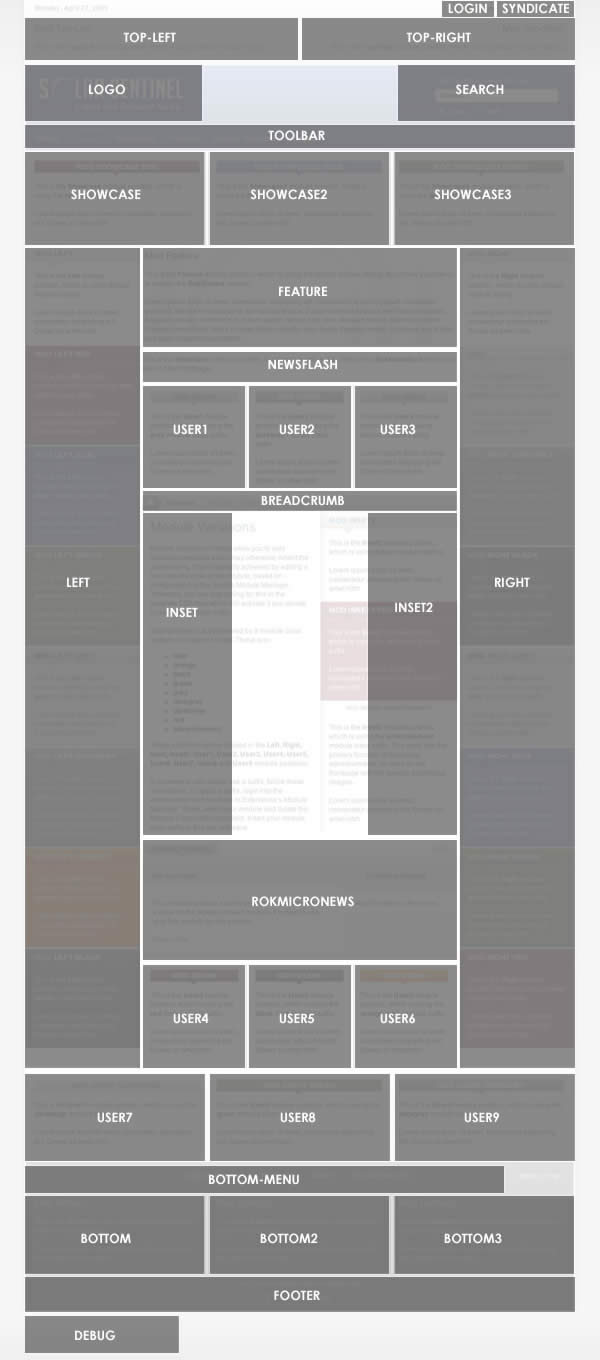
SolarSentinel has been constructed with an assortment of 32 module positions allowing for versatility and flexibility. These module positions are fully collapsible meaning that if there are no modules published in a particular area, that module area will not be shown.
Several of these positions may not appear to be positions, such as the Logo, Footer and Toolbar. However, by publishing modules to see positions, the elements are automatically disabled and replaced by your module content.
RocketLauncher
RocketTheme templates feature some amazingly advanced features and layout possibilities that open up a wide world of options for your sites. Unfortunately, the default Joomla content in a new Joomla install is very limited and does little to take advantage of the abilities of a modern Joomla template.
Each of our demo sites have been highly customised to show off the abilities of each template and give that "professional touch" to the look and feel of the content. This professional look could not be achieved without hands on manual customisation, that is, until now.
SolarSentinel features the exciting RocketLauncher custom Joomla install option. With the RocketLauncher Joomla installer, you can instantly create a Joomla site complete with custom content that is a perfect replica of our demo site that has been professionally tuned to look its best, all with just a few clicks.
The RocketLauncher package consists of a full 1.5.10 Joomla install, complete with all of the demo images, content, modules, and extensions. By running the installer, your Joomla site will be set up with everything needed to create an exact implementation of the demo site automatically.
RocketLauncher includes a FULL Joomla install, in addition to the template and demo contents. The Joomla installation process is necessary in creating the demo content, therefore RocketLauncher will only work properly as a new Joomla installation. It can not be used on an existing Joomla installation.Instructions
Upload the filesDownload the separate SolarSentinel RocketLauncher package (Joomla_RT_SolarSentinel.zip) from the SolarSentinel template downloads section. Unzip the RocketLauncher package, after which you will have a folder named "Joomla_RT_SolarSentinel". Using your FTP client, upload all of the files inside of the "Joomla_RT_SolarSentinel" folder (not the folder itself) to your server as you would a standard Joomla installation package. You upload the files with a FTP client such as Filezilla. Want to learn more...?
Run the Installer
Point your browser to the location where you uploaded your RocketLauncher files (whichever domain/folder you uploaded to, generally the root of your web server). You will then see the Joomla 1.5 installation screen. Follow the Joomla installation on screen instructions. IMPORTANT: Be sure to click the INSTALL SAMPLE DATA button in step 6 of the installation in order to load all of the demo content into your installation.
Further Guides
RocketLauncher Installation Video TutorialLearn the steps to uploading the RocketLauncher package files to your server and installing the RocketLauncher template package by following along with the steps in this detailed video tutorial. It's now easier than ever before to deploy a replica of the RocketTheme template demo sites. Launch Video...
Uploading RocketLauncher to your RootAn in depth guide that details the steps necessary to properly upload the files from the RocketLauncher template package directly to the root of your site. This will ensure your RocketLauncher installation installs to the root of your site, and not in a subfolder. Learn more...
Newsflash
Main Menu
Who's Online
Nous avons 1315 invités et aucun membre en ligne